6 Techniques and materials for architectural model making, Building working prototype, 3D modelling advice
6 Techniques And Materials For Architectural Model Making
February 1, 2024
More than just miniature structures, architectural models bring design concepts to life, providing a 3D perspective that’s impossible to capture on paper. This process of transforming an abstract idea into a tangible model is crucial for study, testing, and presentation. Crafting these detailed models involves carefully selecting tools, techniques, and materials, each playing a significant role in the outcome.
This guide explores these essential approaches, providing invaluable insights for architects, students, and hobbyists alike. Whether you’re a seasoned professional or just starting out, mastering the art of architectural model making can elevate your design process to new heights.
6 Techniques And Materials For Architecture Models
Model Planning Basics
Good planning is the first step toward creating a successful model. Determine the following:
- Purpose: Is the model for study, display, or a working prototype? The purpose will guide your approach.
- Scale: Smaller scales like 1:500 are suitable for larger areas, while larger scales like 1:100 are better for showing finer details.
- Level Of Detail: Study models can be basic, while presentation models require realistic materials and finishes.
- Base: Think about the base of your model. How will the model be mounted and displayed for viewing?
- Materials: The choice of materials should align with your skills and the model’s purpose.
With these key points in mind, you’re off to a good start in making models.
Tools To Create Models
Creating architectural models involves various hand and power tools that aid in cutting, shaping, and assembling:
- Cutting Tools: These include hobby knives, chisels, saws, snips, sanding files, and miter boxes.
- Drills And Drivers: Both manual and electric drills are used to create clean pilot holes.
- Clamps: These tools are helpful in holding parts together for gluing and driving screws.
- Tweezers: They’re used to place small details and apply glue precisely.
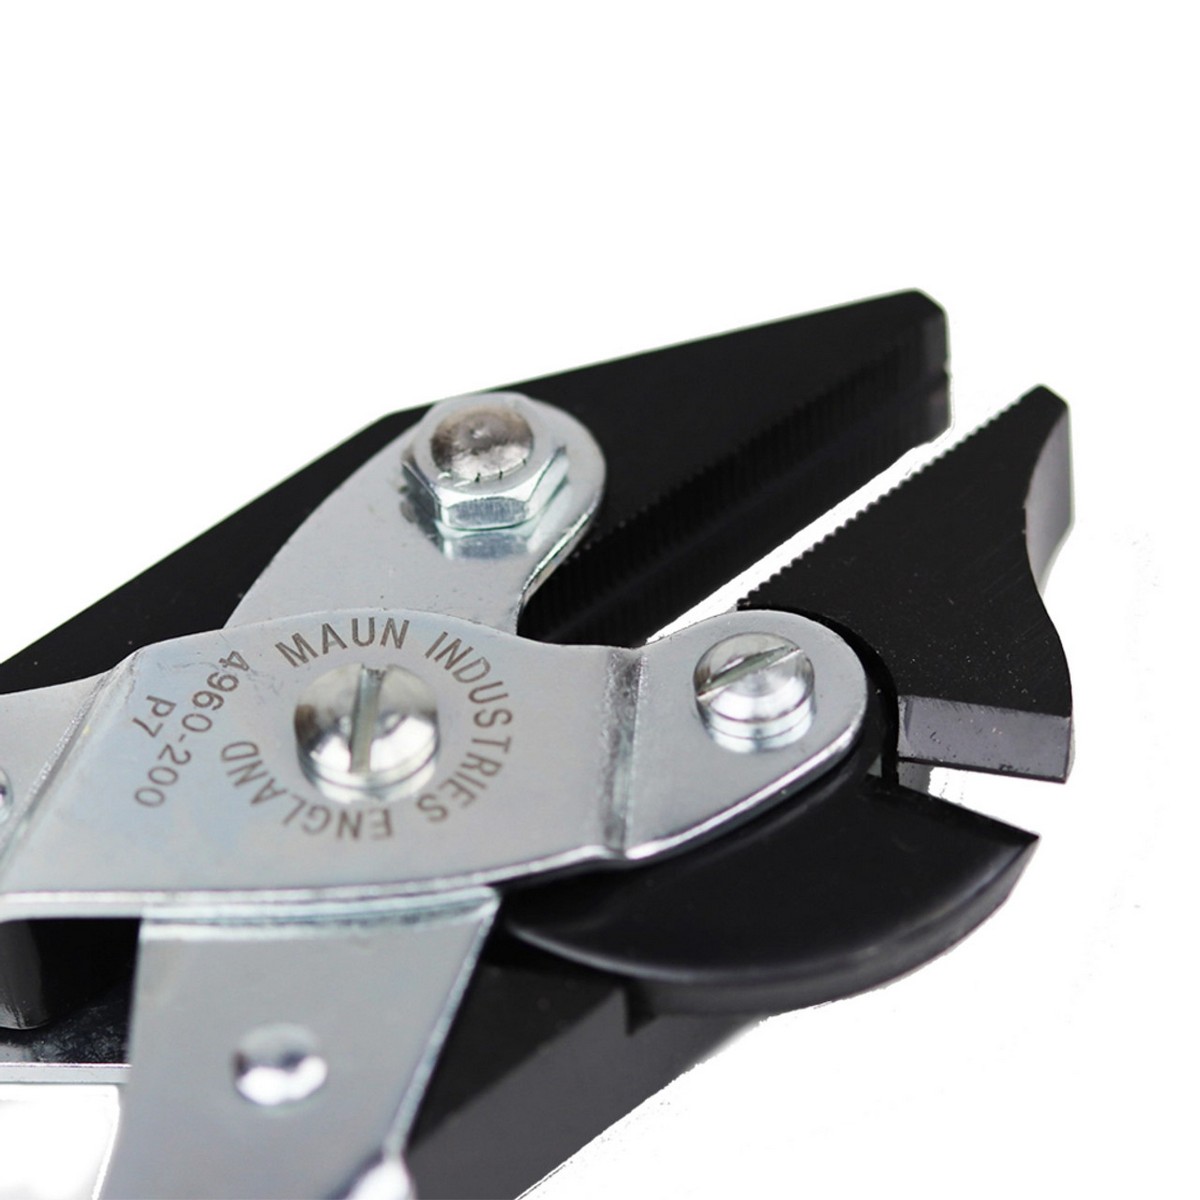
Maun Parallel Pliers
If you’re creating models using metal components, then a set of Maun parallel pliers will be really helpful for you. They’re useful for gripping, holding, and bending tasks.
With the right tools at your disposal, you’re well on your way to creating impressive architectural models.
Techniques For Architectural Model Making
Creating an architectural model is a meticulous process that involves various techniques.
- Cutting And Shaping
After planning your model and gathering your tools and materials, the next step is cutting and shaping.
- Measure And Mark: Start by carefully measuring and marking the cuts needed for each component. This step is crucial as it sets the foundation for the rest of your model.
- Use Straightedges And Hobby Knives: With your measurements marked, use straightedges and hobby knives to cut sheet materials accurately. Precision in this step ensures a clean and accurate representation of your design.
- Score And Snap: For materials like foamcore or basswood, employ the score and snap technique to achieve clean curved cuts. This allows for greater control and precision.
- Sand Cut Edges: After cutting, sand the edges smooth before assembly. This improves the fit and enhances the overall finish of your model.
Cutting and shaping require precision and patience, but the end result makes it all worthwhile.
- Joining And Gluing
Once the components are cut and shaped, it’s time for joining and gluing. This is more than just sticking pieces together; it’s about creating a strong and stable structure.
Different types of adhesives are suited to different materials and purposes. For instance, white glue is effective for bonding foam and mat boards. It creates a neat and sturdy bond, making it ideal for larger pieces. On the other hand, cyanoacrylates, commonly known as superglue, offer quick adhesion and are particularly useful for detailed sections that require a strong bond in a short amount of time.
When working with materials like basswood framing, you might need to drill pilot holes to attach components with pins or micro-screws. This ensures a secure fit without splitting the wood.
Regardless of the type of adhesive you use, it’s important to apply it sparingly. Too much glue can lead to messy seepage and smudges on visible materials, which can detract from the overall appearance of your model.
- Smoothing And Filling
After the assembly of your model, you might notice some gaps, seams, or imperfections. These can be filled using specialty hobby putty designed for models. This putty is formulated to adhere well to model materials and dries hard for durability.
Once the putty is dry, the next step is sanding. Sand the filled areas until the fix blends smoothly and invisibly into the rest of the surface. This step ensures a seamless look and feel, enhancing the overall aesthetic of your model.
- Priming
Once your model is assembled and smoothed, it’s time for priming. Priming prepares your model for painting by creating a uniform surface that paint can adhere to effectively.
Prime all surfaces with gesso or specially formulated model primer. This step also helps bring out the details of your model by providing a neutral base for your paint colors. Remember, a well-primed model will result in a more professional-looking finish.
- Painting And Coloring
After priming, your model is now ready for painting and coloring. This is where your model starts to come alive as you add colors and textures that reflect your design vision.
- Brush Painting And Airbrushing: Brush painting provides coverage, while airbrushing adds a level of smoothness and uniformity that can’t be achieved with a brush alone. The choice between the two often depends on the level of detail and finish you’re aiming for.
- Adding Dimension: To add dimension and depth to your model, consider using colored pencils, pastels, and washes for detailing and shading. These tools can help highlight the unique features of your design and make your model more realistic.
- Simulating Real-World Finishes: Use wood stains, metallic paints, and stone texturing paints to simulate real-world finishes. These can give your model a more authentic look and feel, closely mirroring the materials you would use in a full-scale version.
With the right painting and coloring techniques, your architectural model can accurately represent your design vision.
- Protective Coating
After all the hard work of planning, cutting, shaping, joining, smoothing, filling, priming, and painting, it’s important to protect your model with a protective coating.
Seal your completed models with matte, satin, or gloss clear coats to protect your paint jobs. This preserves your work while enhancing the overall appearance of your model.
With these steps, your architectural model is now complete. Each step in the process, from the initial planning to the final protective coating, has a crucial impact on the outcome of your model.
Essential Model Making Materials
In architectural model making, choosing the right materials is as important as mastering the techniques. Here are some common materials:
- Balsa Wood: This is easy to cut and shape, making it ideal for creating striplike framing elements.
- Basswood: Thin sheets of basswood are perfect for surfacing or creating laser-cut detail parts.
- Foamcore: This material coats easily and carves well, making it great for shaping base forms.
- Acrylic Sheets: These are optically clear, making them a good choice for windows and glass features.
- Clay: You can sculpt and carve clay into any form.
- Paper And Cardboard: These versatile sheet materials are often used for model surfaces.
- Wood Veneer: For ultra-thin, real wood cladding texture, wood veneer is a great option.
The choice of material can greatly influence the look and feel of your model. Choose wisely based on your design and the level of detail you want to achieve.
The Takeaway
Architectural model making is a blend of art and science, requiring careful planning, precise execution, and a keen eye for detail. With the right tools, techniques, and materials, you can transform your design concepts into tangible models.
Keep crafting, keep learning, and most importantly, enjoy the process. Happy model making!
Comments on this guide to 6 Techniques And Materials For Architectural Model Making article are welcome.
Colorado Buildings
Contemporary Colorado Architecture Designs – recent selection on e-architect:
Pinnacle Court Residence, Carbondale
Design: Jess Petersen Architecture
photo : Mountain Home Photo
Risingmountain Aspen
Design: NO ARCHITECTURE – architect Andrew Heid

render © No Architecture
Architectural Design
Architectural Design Posts
The Plus Furniture Factory, Magnor, Norway
SAWA wooden building Lloydquarter, Rotterdam, The Netherlands
Comments / photos for the 6 Techniques And Materials For Architectural Model Making page welcome