
How to seal a shower enclosure?
post updated 27 May 2026
Sealing a shower enclosure properly prevents leaks, mold, and long-term water damage. Here’s a clear, practical step-by-step guide you can follow:
What You’ll Need:
– Silicone sealant (look for “bathroom” or “sanitary” grade, mold-resistant)
– Caulking gun
– Utility knife or scraper
– Masking tape
– Cleaning cloths
– Rubbing alcohol or mild cleaner
– Paper towels
Optional: sealant smoothing tool (or just your finger)
Step-by-Step Guide:
1. Remove Old Sealant
Use a utility knife or scraper to carefully cut away the old silicone.
Pull it off completely—any residue can prevent a good seal.
2. Clean the Area Thoroughly
Clean all joints (where glass meets wall, tray, or tiles).
Use rubbing alcohol or a bathroom cleaner to remove soap scum, grease, and mold.
Let everything dry completely (this is crucial).
3. Apply Masking Tape
Place tape along both sides of the joint to create a clean, straight line.
Leave a small gap where the sealant will go.
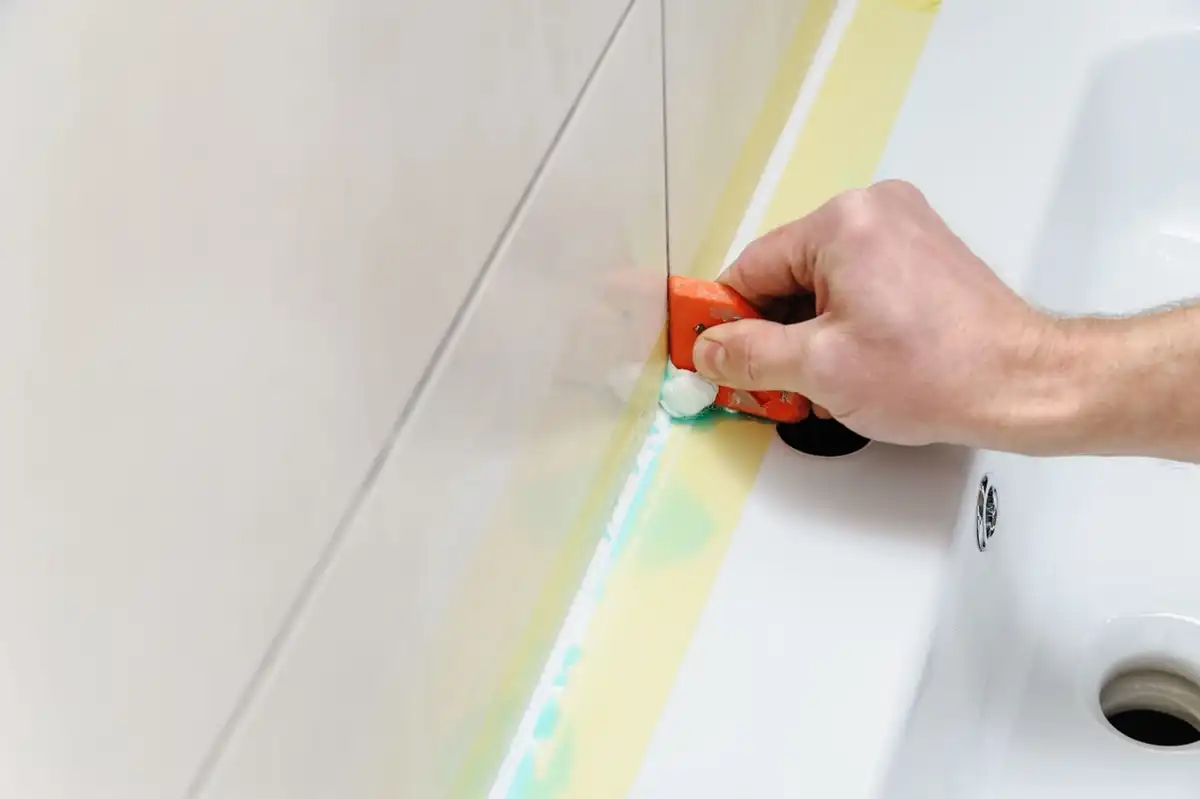
4. Apply the Silicone Sealant
Cut the nozzle at a 45° angle.
Load into the caulking gun.
Apply a steady, even bead along the joint.
Move slowly to avoid gaps or bubbles.
5. Smooth the Seal
Immediately smooth the bead using:
A sealant tool, or
Your finger (slightly wet it to prevent sticking)
Press lightly to ensure the silicone fills the gap fully.
6. Remove Tape
Peel off masking tape while the silicone is still wet for clean edges.
7. Let It Cure
Allow the sealant to cure for 24–48 hours (check the product instructions).
Avoid using the shower during this time.
+++
Learn about sealing a shower screen!
How to seal a shower enclosure – insulation types and how to use them
In any bathroom, the shower enclosure should be kept immaculately clean and feature a tight seal. Otherwise, the bathroom floor will be permanently wet, leaking water will cause ugly stains, and mold may begin to appear on the walls.
So it’s a good idea to arm yourself with some basic knowledge about shower enclosure sealing – any handyman can do it himself! Sometimes it’s not the seal though and you’ll need more complicated work done. In this case you should consider hiring a professional shower screen repair company like Shower Ranger.
In order to keep your shower enclosure airtight, it’s essential to use special insulation to prevent uncontrolled leaks and rising damp. Below are some of the best and most commonly used solutions.
Liquid insulation film is the key sealant here. Before you lay tiles, you cover the walls and floor with the film. This way, we protect them from the damaging effects of water that enters the gaps between the tiles, doing serious damage.
Insulation tape is mainly used in places where we have a bathroom faucet and shower. When taping, we need to press the tape well so that it creates a tight fit.
We install the corners and insulation strips mainly under the wall with the shower, but also in places where the wall meets the floor. The installation consists mostly of pressing the insulation elements into the silicone layer.
Fungicidal properties are a very important component of the sealants. We should keep this in mind when making a purchase, because a sealant with such properties will protect us from later replacement of a moldy silicone strip.
Sanitary silicone is the best friend of any shower enclosure. It tightly plugs all gaps minimizing the chances of water flooding the bathroom. In addition, it has fungicidal properties and protects against the formation and spreading of moisture.
The products are available in a set with the purchase of the cab, but you can also buy them on your own. The purchase in a set is so much better that you will get all the necessary elements at the same time.
Video about how to properly re-silicone a shower? on YouTube
The process of sealing the cabin
The first step in sealing the cabin is to properly prepare the walls and floor. We start by cleaning the surface and applying a layer of primer, which will properly prime the surface. Next, we use a brush or roller to apply a coat of liquid waterproofing membrane that will ensure water is kept away from our walls and floor. At this point we get the green light to lay ceramic tiles. The further course of the process depends on the type of cabin we decide on.
Sealing the connection between the shower base and the wall
A shower enclosure with a shower tray has one weak point that needs special attention. This is the gap between the wall and the shower tray. It must be sealed very well with materials with a guarantee of durability. Then the water from the shower will not get into the undesirable corners. The seal should be flexible enough not to crack when using the shower.
According to Local Technician the best choice here is sanitary silicone, which is resistant to oxidation and the damaging effects of fungi. Freshly applied silicone should be moistened with lukewarm water mixed with soap or washing-up liquid. Then you will have the opportunity to profile the applied grout. Silicone grout should be replaced once every few years.
In cabins without a shower tray, the insulation is mainly focused on the floor and the drainage system. The use of liquid foil here is identical to that in shower enclosures with a shower tray. When sealing the linear drainage elements we should focus on the joints, where the probability of leakage is the highest. Many systems also have their own protective elements. These are specific flanges, which make the sealed joints even more secure.
Another film on YouTube about How to silicone a glass shower screen
Sealing the cabin wall-to-wall joint
The next step is sealing the joint between the shower enclosure wall and our wall. This is a process that requires great precision. The best way is to coat both the wall and the part of the shower wall that is to adhere to the wall with a layer of silicone before installation. This will bond the two layers of silicone together and is most likely to avoid leaks.
It is not worth installing the cabin first. Injecting silicone into the created gap will be a strenuous task, moreover there is a high probability that you will dirty the tiles on the wall and the cabin wall in the place of joining. The cleaning of such dirt is by no means a quick and pleasant task.
Sealing it yourself is not difficult
The installation and subsequent sealing of the shower tray and shower enclosure should not be a problem for the average DIY enthusiast. Of course you can hire a professional for this job, but with the right knowledge, you can easily avoid this unnecessary expense.
Comments on this How to seal a shower enclosure guide – sealing a shower screen advice article are welcome.
Bathroom Showers Design
Home Showers Screens and Cubicles
How to fit a glass shower screen
Shower cubicles for small bathroom
The Best Showers and Where to Buy Them
Why Does the Shower Curtain Move Toward the Water?
Home Bathroom Articles
Design Ideas for a Small Bathroom Renovation
Innovative design trends in bathroom renovations
++
Building Articles
Residential Property Posts
Comments / photos for the How to seal a shower enclosure advice – sealing a shower screen process page welcome


